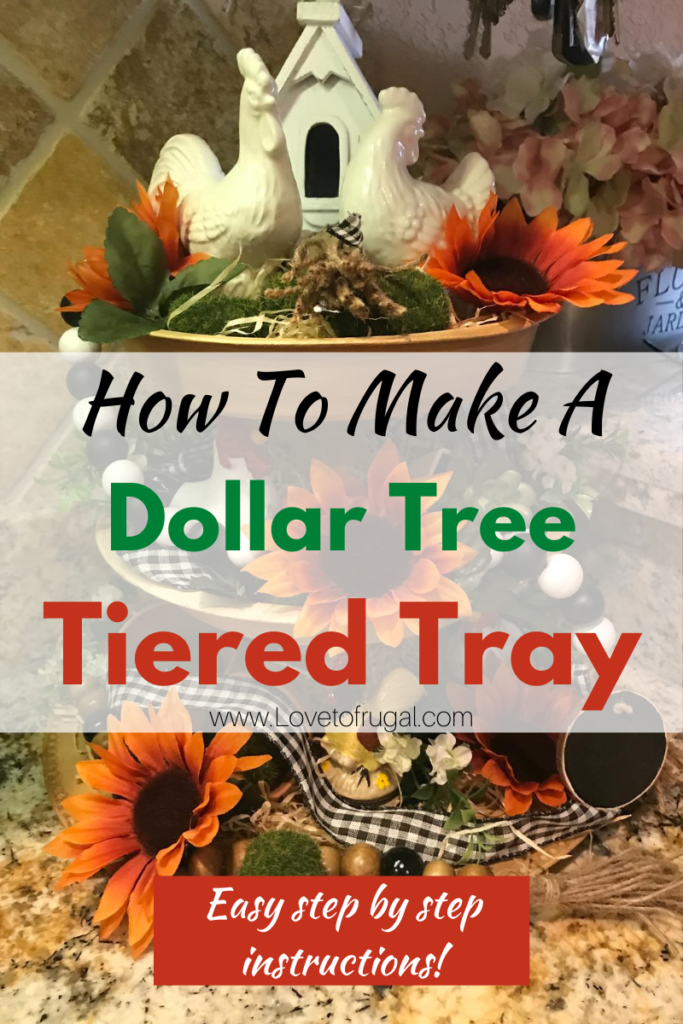
How To Make An Easy Dollar Tree Tiered Tray
If you enjoy decorating your home for the seasons, then a tiered tray is a must, but if you’ve looked at the prices of the ones at the department stores, you might be thinking that you don’t want to spend that kind of money…especially if you have a tight budget. I’m going to show you how to make an adorable Dollar Tree tiered tray for literally just a few dollars! Once you’ve put it together, painted it with your choice of colors and decorated it, it’ll be as cute as the expensive ones if not better!
Having a tiered tray in your home is one of the easiest ways to add seasonal cheer to your home and it can be used so many different ways.
I have mine in my kitchen, in a corner on my counter, but you can also put one in your bathroom to hold makeup, jewelry, hand towels, soaps, etc. They make beautiful centerpieces for your dining room or kitchen tables and can you imagine how adorable it would be with cookies and/or cupcakes on them? For you coffee lovers, this would make a great piece to add to a coffee bar, as well!
This is such a versatile decor piece and the best part is…you don’t have to spend hardly any money to get a huge bang for your decorating buck! I’m talking $5 to make!! That’s it!! It just doesn’t get any better than that and anyone can do this! No artistic ability needed!
*This post may contain affiliate links. For more information, see my disclosure page.
How To Make An Easy Dollar Tree Tiered Tray
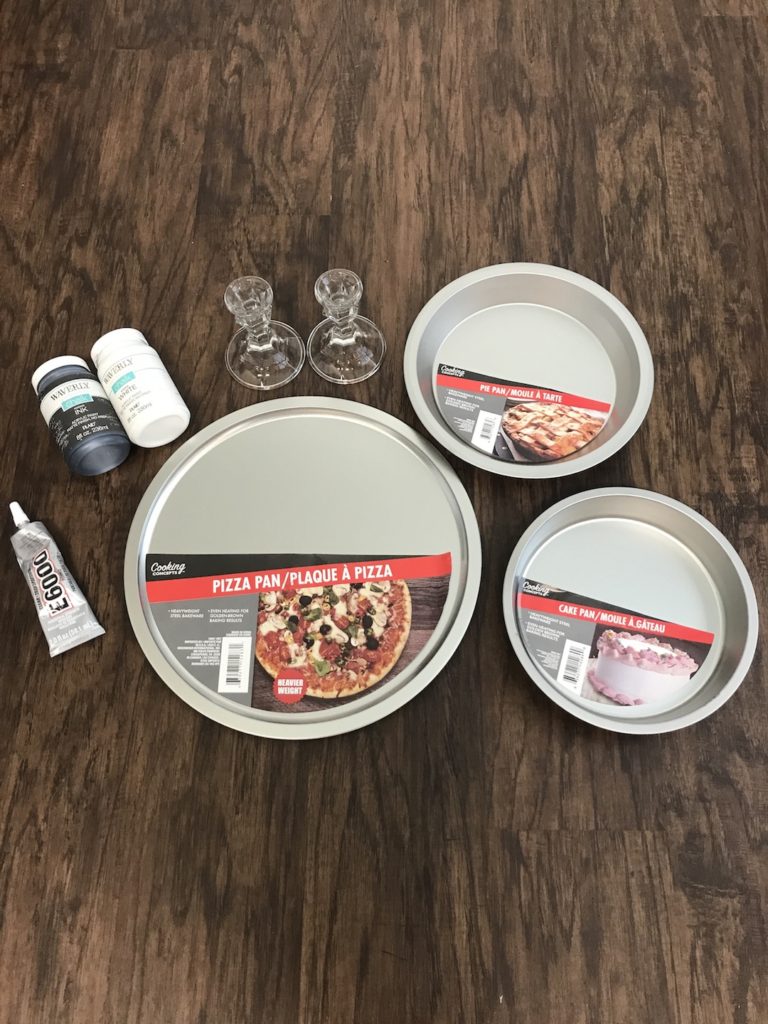
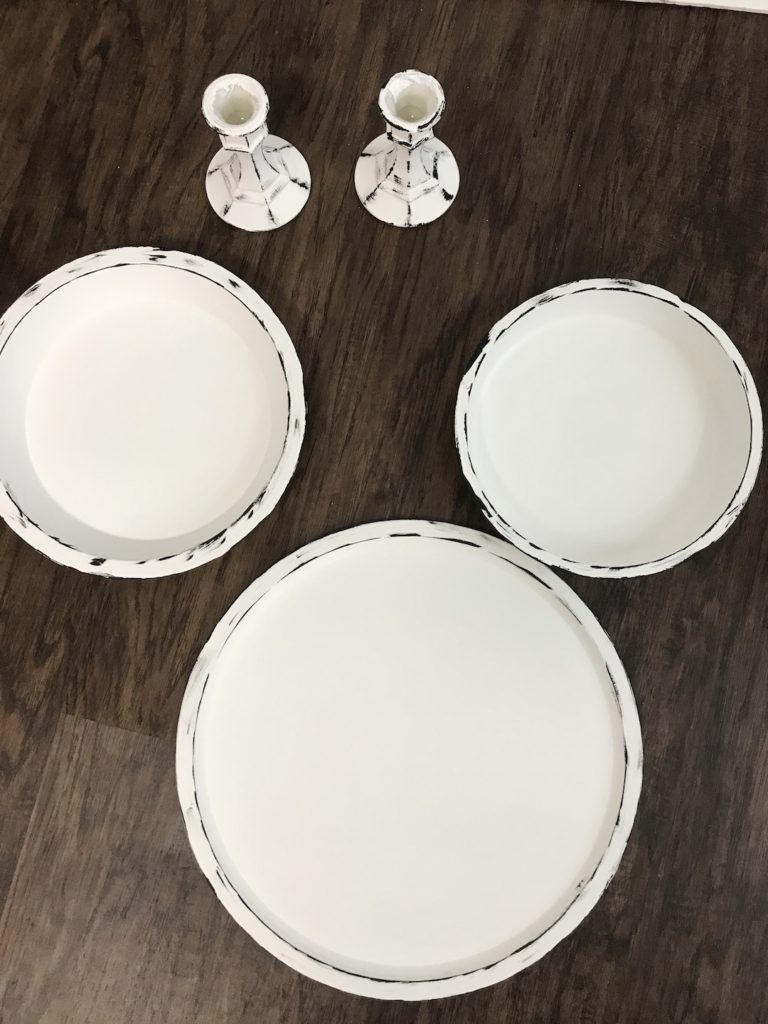
Supplies needed:
Head over to your local Dollar Tree and pick up:
- 2 glass candlesticks
- Pizza pan
- Cake pan
- Pie pan
- E6000
 glue (or hot glue) (Dollar Tree does sell Super Glue if you don’t want to buy E6000)
 - Paint in your choice of colors. I prefer to use a chalk paint because it has wonderful coverage (usually one coat will do), it adheres to just about any surface and it dries quickly.
Let’s make it!
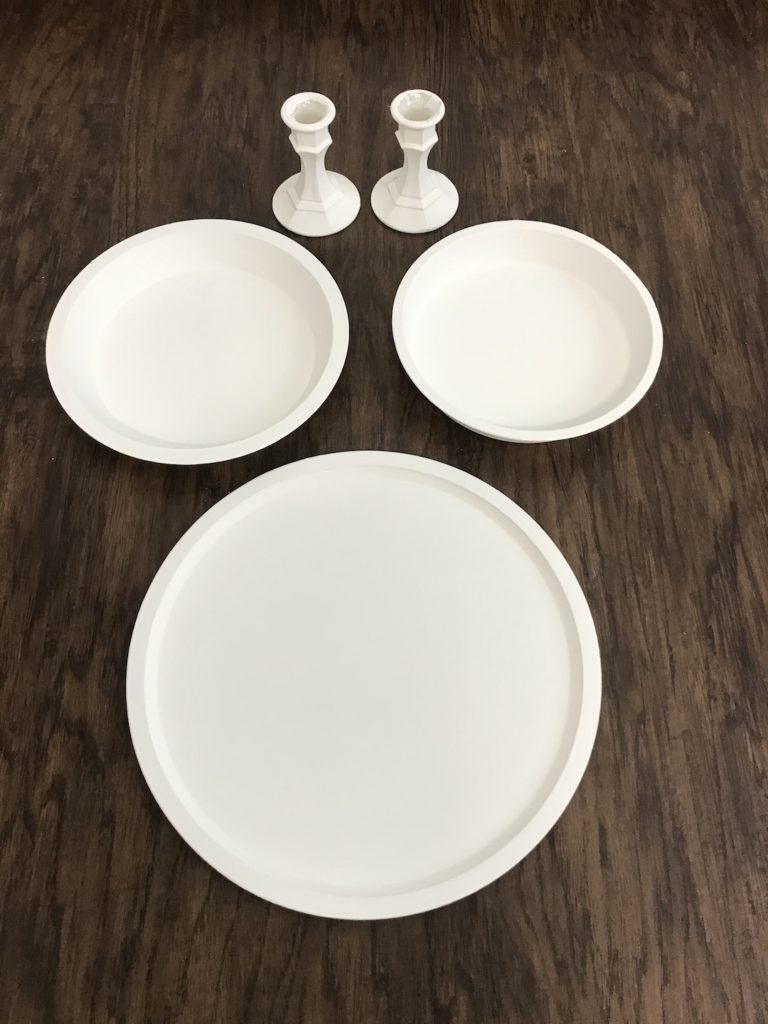
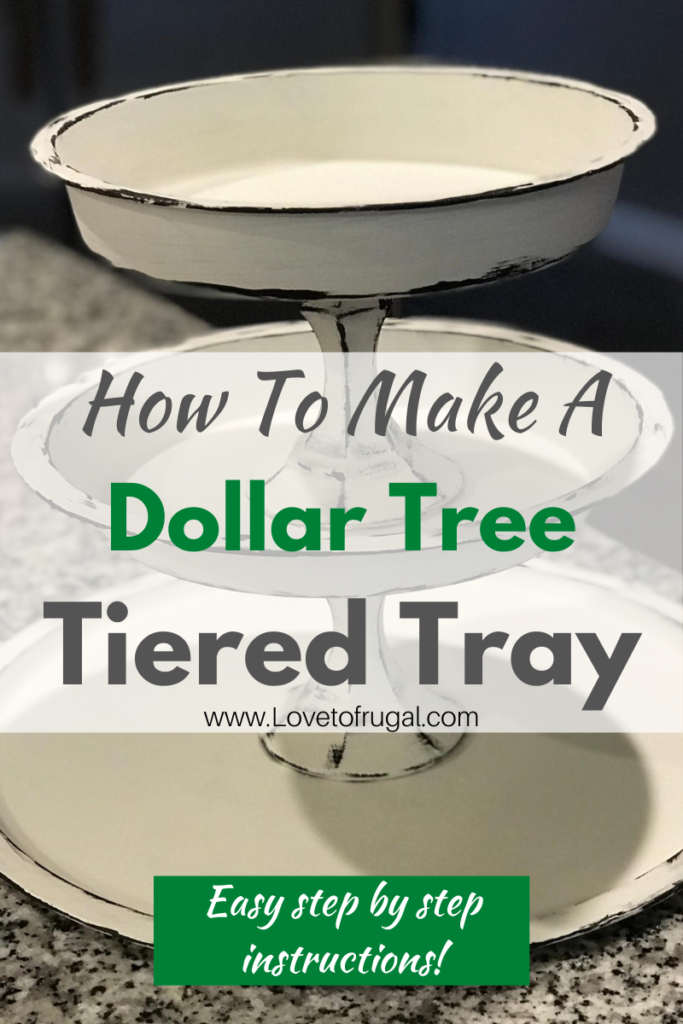
Paint your five pieces with 1-2 coats of chalk paint. I’m painting this one with Waverly white. To make it look very farmhouse, I’m going to duplicate an enamelware look.
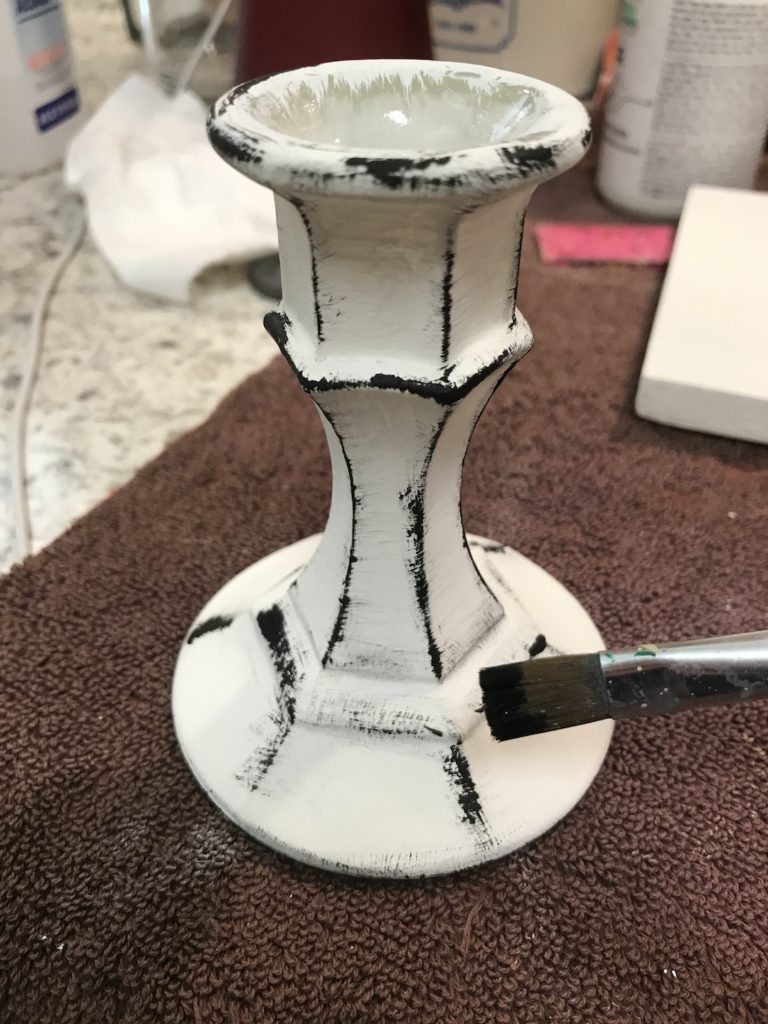
Once the white paint has dried, I use a black acrylic paint to lightly dry brush the edges (corners) of each piece. If you’ve never tried the dry brushing technique, all you do is dip your brush in the desired color and wipe most of the paint off with a paper towel. Then, lightly brush the edges of the piece (like above) until you get the desired look. You really can’t mess this up, so don’t be afraid of doing this.
Chalk paint is very forgiving, so if you’re not happy with the way it looks, it’s easy to cover up with the white and try again.
My Dollar Tree tiered tray is beginning to take shape, as you can see!
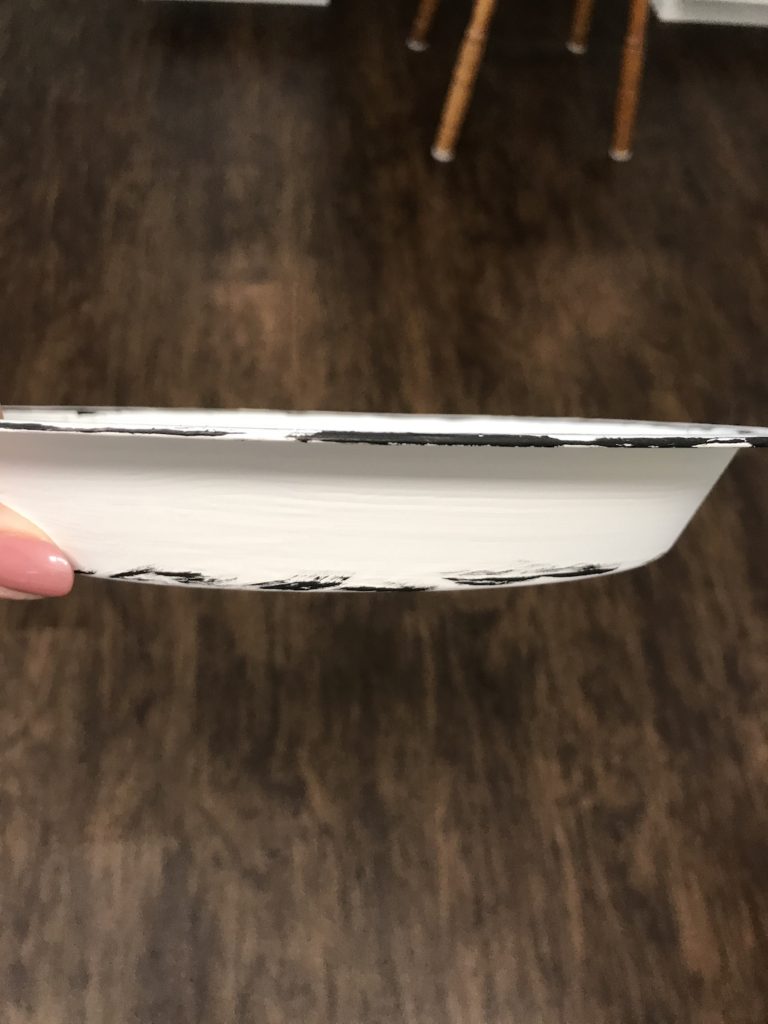
Here’s a close up of what the edges look like on the pans. As you can see, you just drag the paint brush around the edges with no pattern. The more random, the better!
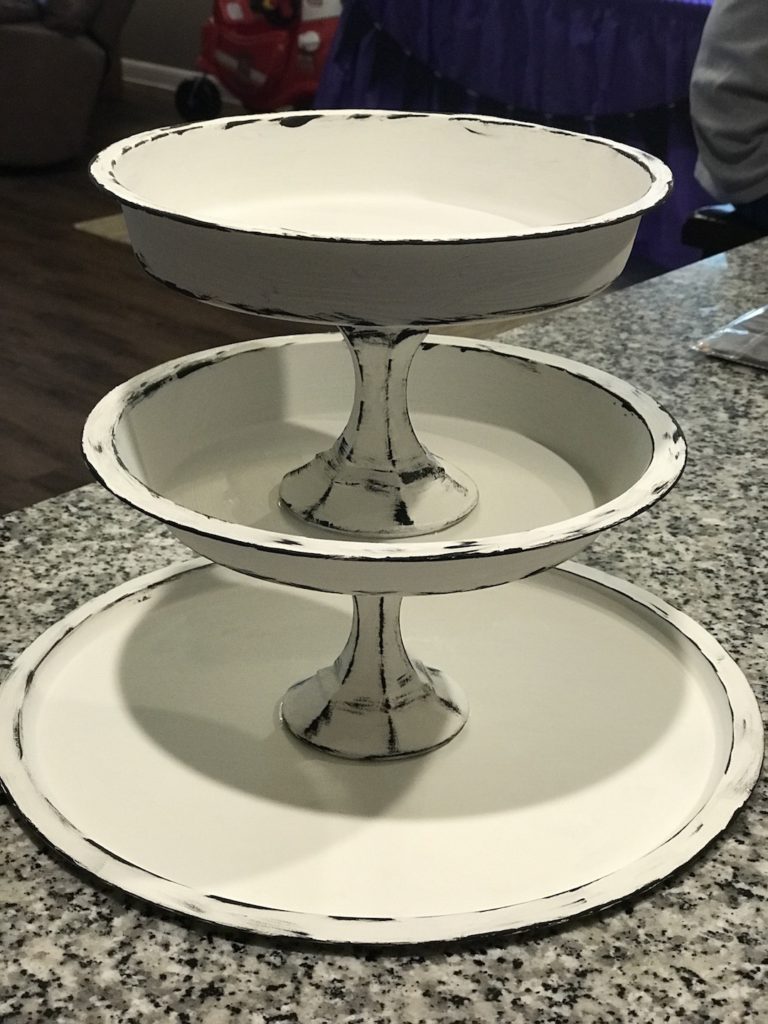
I gave this dollar tree tiered tray to my daughter and she loved it! The white enamel ware look fits into her decor, perfectly as the farmhouse look is more her style!
Let’s Put It Together!
Once you’re finished with that step, it’s time to clue your pieces together, as shown above. The pizza pan is on the bottom, followed by the pie pan and last, the cake pan.
I highly recommend using E6000 glued if you want a permanent bond. Hot glue will also work, but it will not hold like E6000 will. Hot glue is great if your making a tiered tray for a party and you would want to disassemble afterwards.
When you get it glued with the E6000, I would suggest putting something weighted, like maybe a book on top, while it’s drying. Allow about 24 hours to make sure that the bond is completely set and dried.
Another version of the dollar tree tiered tray:

The above pic is my own dollar tree tiered tray. I used a Dollar Tree charger for the base (instead of a pizza pan) and this one was actually the very first one that I made. A charger is another option. I painted it with 2 coats of Waverly chalk paint (FolkArt![]() & Rust-Oleum
& Rust-Oleum![]() make a very good chalk paint, as well) in the color Ivory and I antiqued it with with Waverly Antique Wax sealer.
make a very good chalk paint, as well) in the color Ivory and I antiqued it with with Waverly Antique Wax sealer.
The sky is the limit on how you can make your dollar tree tiered tray look! If you prefer a more industrial look, you don’t even have to paint your tray. Leave the pans silver and the candlesticks clear!
The beauty of this fun little tray is you can make it match your own decor, perfectly!
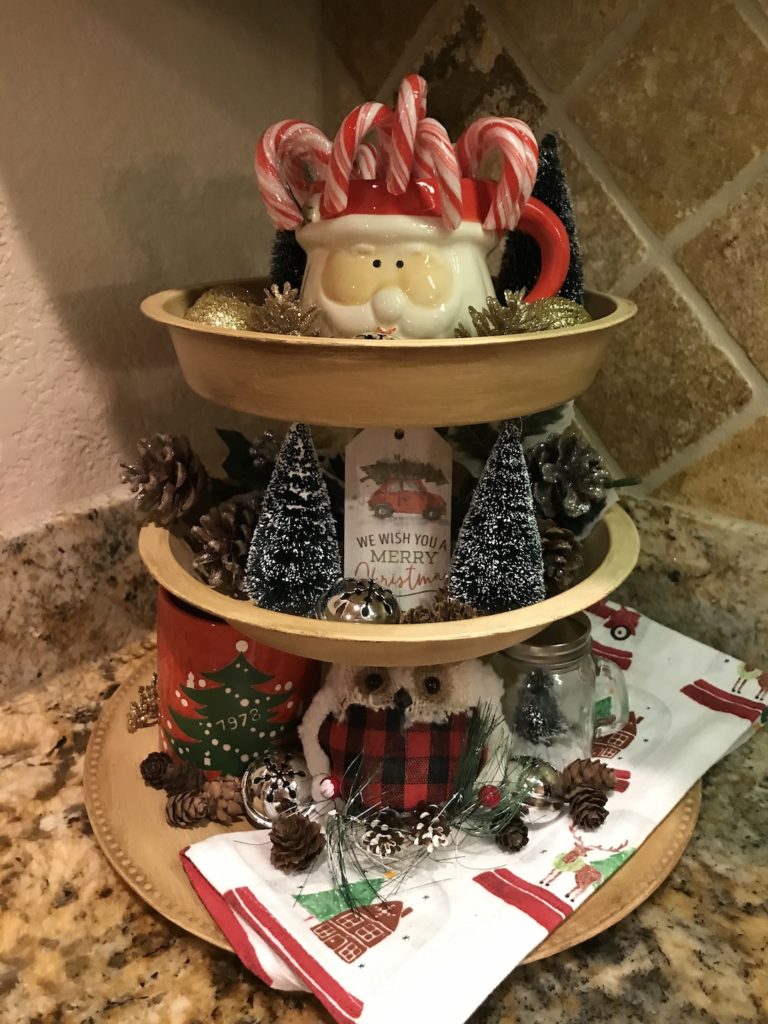

Styling your dollar tree tiered tray
This is the fun part! The first thing I do, depending on the season, is I look around my house, first! I look for items that are small enough to fit on the tray, like knick knacks and what nots. I’ve also used cute salt & pepper shakers, mugs, pretty cup towels, books, silk flowers, pine cones, ornaments or whatever I have on hand.
Dollar Tree is a great place to find items for the tiered tray as well as thrift stores. I also enjoy making items or repurposing things.
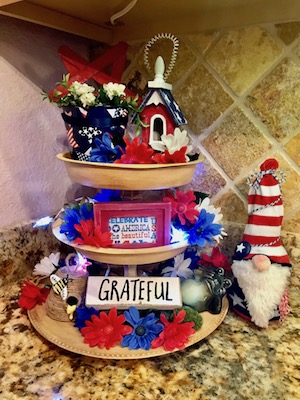
As you can see below, I had a small piece of scrap wood that I painted white and wrote the word “GRATEFUL”. It’s versatile and can be used for almost any decor or season.
On the patriotic tray, I painted a small birdhouse red, white & blue and on the middle tray, I took a 2×3 picture frame (that I found at Dollar Tree), painted it red and I switch out the sentiment according to the occasion. Scrapbook paper is a perfect option for this and so easy to do OR you can print out your own sentiment (“Love” on the Valentine tray).

Please share to pinterest, friends!
I hope this DIY was helpful for you! Your shares are how this site grows and I appreciate every single share, more than you know. If you wouldn’t mind, please save this to your favorite Pinterest board or share it with friends on Facebook. Shares help me to keep doing what I’m doing.
Other posts that may interest you:
How To Make A No Sew Fleece Blanket
How To Make A DIY Dollar Tree Fall Centerpiece
Easy DIY No Sew Napkin Pillows
Make sure to subscribe to Love To Frugal so you never miss a post AND follow me on Pinterest, Facebook & Instagram for more fun, money saving, frugal ideas!
This is so gorgeous!
I have a question tho, did you use some kind of sealer or finisher on the paint when it was all done? Or does the chalk paint that you used not need anything? I want one of these in my kitchen for fruits and things and I’m worried that it may get wet..
Hi Jamie!
Yes, I used Folk Art’s wax sealer on both of them. It’s a clear, brush on sealer/varnish. It protects the paint and makes the surface more wipeable. It also make the paint look less flat. You can also use a spray varnish, as well. It’s definitely optional, as chalk paint tends to cure by itself, but I would definitely recommend it.
Kimberly
Can you get the sealer at the dollar tree? I want to make my own tier tray now.
Hi Stephanie! I have not seen sealer at Dollar Tree. I usually buy mine at Walmart. Have fun making your tray! 🙂
Could I ask what a “Dollar Tree Charger” is? (A suggestion you made instead of the pizza pan.)
Hi Mary!
A charger is a large, round plastic plate that usually goes under your dinner plate. It’s not used for eating on, but more for decorating your table. Dollar Tree usually sells these in 2-3 colors…gold, silver and sometimes red. They might be a tad bit smaller than a pizza pan. Hope this helps.
Kimberly
Hi Kimberly, I painted this three tiered tray, love it!! I have Folkart Home Deco Clear Wax, but it doesn’t say its a sealer. Is it the same wax as you suggested? Thank you.
P. S. Love your Ideas!! The dollar store no longer sells the glass candle stick holder, but I found 2 at the Good Will.
Thank you.
Nancy
Hi Nancy!
The Folkart Deco Clear Wax is a sealer. It should work fine and it is the same as I referred to in the blog post.
Glad you found the candle sticks. I did purchase 2 at my local Dollar Tree last week, so be sure to check other Dollar Trees. It may be just that particular store that doesn’t have them. I have found that every Dollar Tree is different. What you can’t find at one, others may have.
I’m so glad you like this project. It’s one of my favorites too! I’ve had so much fun decorating mine for every season.
Love the look of your tier tray. Do you have a post with pics or directions detailing how you got the finish on yours? I like the farmhouse look, but it doesn’t really match with my decor. Yours does perfectly! Thanks!
Hi Tyra! I painted my tray with chalk paint in the color Ivory. I then took antiquing wax and rubbed it over the pans and wiped off with a clean dry cloth until I achieved the desire effect. One tip that I have is before antiquing, spray the tray with a sealer/varnish, let it dry and then put the antiquing medium on it. This makes it much easier to wipe off because the chalk paint absorbs the antiquing quickly. The sealer will give you a little time to manipulate the wax. Once you achieve the look you want, let the antiquing wax completely dry and then you can spray it one more time to seal it.
Hope this helps!
So easy and so pretty. Just takes a little time. I love it!! I going to make more for family
Hi Rita! These trays are so much fun to make and even more fun decorate! They make great gifts, too! I’ve made a few for friends & family, as well!
I hosted a ladies craft night and we made these trays. They were a huge hit and easy enough for all levels of crafters. Thanks for this wonderful idea! We are now organizing craft nights around making tiered tray decor around every holiday.
Hi Tara! That sounds like so much fun and what a great idea!! I’m so glad you all enjoyed it!
I noticed my Dollar store sells chalk paint. Is this the kind you used?
I haven’t used the dollar store chalk paint, but you could certainly give it a try! I may take an extra coat, depending on how thick/thin it is. I usually use either Waverly chalk paint or Rustoleum Chalked. Both are available at Walmart.
Just double checking…it looks like you paint first and glue later? Do you paint all sides/all around? (Wanting to make sure the painted sides bond well with the E6000 glue vs bonding an unpainted surface.). Thanks so much!
Hi Mary,
I usually paint first because it’s easier for me. You can certainly glue first and paint second. One thing I do if I paint first is to roughen up the areas on the flat surface and the candlesticks where you will be putting the glue. Once the glue has dried, then seal the tray. If you choose to glue first, then this step (roughing it up) isn’t necessary.
Hope that helps!
How can you make this food friendly? I’m looking for a way to display cookies.
Hi Laura!
You could use cup cake liners, doilies, wax paper, etc to put between the food and the tray. I’m sure they make food safe paint, but I don’t know of any right off hand. Paper doilies would be my favorite choice and I believe you can also get those in the party section at Dollar Tree.
Thank you , love this and will be making some. ABSOLUTELY love the farmhouse , rustic look.
Hi, just wondering how you keep the trays from getting scratched and the paint chipping off…. Did you use a sealer? Which one?
Hi Ulli! Yes, I used Waverly Wax sealer on both the trays in the post, but you can also use a clear spray varnish. Chalk paint, once it’s cured, is pretty durable, but I do recommend giving them a bit of extra protection and sealing them. Hope that helps! 🙂
I’m worried the E6000 isn’t gonna be enough. If I want to do both the hot glue gun and the E6000, which should I do first? Lol sorry I’m a newbie that’s clueless to the crafting world 🙂
Hi Christina!
You can certainly do both. Just make sure to glue the candlesticks to the pans before you paint. The glue will hold much better.
Hello,
These look so cute! Are they safe to serve food in? Or just decoration?
Hi Silvia! They’re mainly for decorations, but if you’d like to to serve food on them, I would just cut some pieces of wax paper line the bottoms of the trays. That will also help to protect the surfaces of your trays.
Are your pans non stick pans? I’m worried that the paint won’t adhere to the pans if they are non stick. Thank you.
Hi Kathy! I used pans from the Dollar Tree and I don’t believe they’re non-stick. I think you could use the non-stick, but just make sure to spray them with a sealer when you’re done painting them. Also, if you use a chalk paint, that type paint will stick to just about anything.
I really like your project and the different the various decorative ideas you used. Your project motivated me to create this project and try some of my decorative ideas. Thank you
Thank you so much, Wanda! I’m so glad you like this project! 🙂
Can food be put on these trays
I wouldn’t put food directly on them, but you could cut some wax paper to fit on the bottom of the pans for a barrier.
Someone said they couldn’t find the glass candle holders at their dollar tree but can be purchased through dollartree.com. Minimum to order is four. In some cases you can have free shipping if you have order sent to your nearest dollar tree.
Thanks so much for the info, Gayle!
I purchased the supplies from a dollar store but the cake pan was non-stick. The chalk paint will not adhere to it. Is there something I can do to the pan to make it stick or should I buy another pan? The pie plate worked fine but it must have a different coating.
Hi Valerie! What you could try is to spray the pan first, with a sealer and let that dry. Then, use the chalk paint over that. That will give the paint something to attach to. Also, with each coat, let the paint dry completely in between coats. I hope this helps.
Kimberly